App for Android “7-piece Chess Endgame Training”
1. The purposes of the program
"7-piece Chess Endgame Training" provides online-access to a huge database containing evaluations of all 3-7 piece positions. The database is known as 7-piece Chess Lomonosov Tables. The size of the database is 100 TB (100 000 GB).
You can
- setup any 3-7 piece position on your device and quickly see its precise evaluation,
- play endgames against the program,
- train using a set of endgame positions supplied with the program,
- see evaluations of different moves in a position with the help of a position tree,
- see good and bad squares for a selected piece on the board,
- store your favorite positions, and export and import them together with lines to play.
Your device needs Internet connection to access the tables, and it may take a few seconds to retrieve variations for 7-piece positions from the server. The program buffers server data providing instant access in case of subsequent queries to the same positions. 3-piece tables are built into the program resulting in instant response for such endgames.
The current Android application is free of charge. A paid version will be available at a later date. The paid version will have additional features, such as:
- No ads while working with Tree view screen
- High-priority access to the server
- An option to download the 4-5-pieces tables to the device and work with them without internet access (requires up to 3 GB of memory)
- Good and bad squares feature working for 7-piece endings
- 500 standard endings bundled for training purposes
- Other extensions
2. Modes, Screens, Menu, Help.
The various features of the application are grouped into several modes. You can choose a mode from the Main menu which is opened with the Menu button  , located in the upper left corner of the screen (see button [1] on img.3 below). img.1 shows a part of the Main menu. The first menu item allows users to register and log in. Registration is recommended, but not required. The menu items below the Sign up/long show the names of the various modes:
- Position - set up a position, browse lines, view tree, play against the computer
- Contents - browse hierarchical content list to access typical endgame positions to play
- Lessons - view lessons and select the tasks to solve
- Training - solve selected endgame tasks
- Favorites - browse your list of favorite positions
- Settings - change program options
- Feedback - send a message to developers with a problem description or a suggestion to improve the program.
Position and Training include additional screens for viewing notation and tree. Switch between screens with the corresponding buttons (see buttons [4,5] on img.3 below).
You will see the Local menu  button (see button [3] on img.3) in the upper right corner of many screens. This button is used to select less frequently used operations. Here on img.2 you can see local menu items in Training mode.
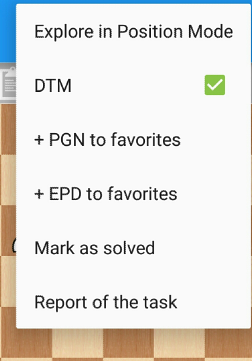 Img.2 Local menu
 The Local menu button is also implemented on many devices as a hardware button.
Some users may find it more convenient to control the program is using gestures. Although the program displays buttons to move right and left, up and down these actions can frequently be performed using gestures.
If you are not sure what function a button performs, just hold it for a second and a tooltip describing the action it performs will be displayed.
3. Position mode
The first time you launch the program after installation, it starts up in Position mode. Position mode allows you to set up a position, probe the server for evaluations, display the best variation and list the best moves from a position. There are 3 screens in Position mode: Board, Notation, Tree.
3.1 Board screen
The Board screen displays a chess board, Main [1] and Local [3] menu buttons and position evaluation[2] field. The best move is highlighted on the board with a green arrow. All buttons are described below.
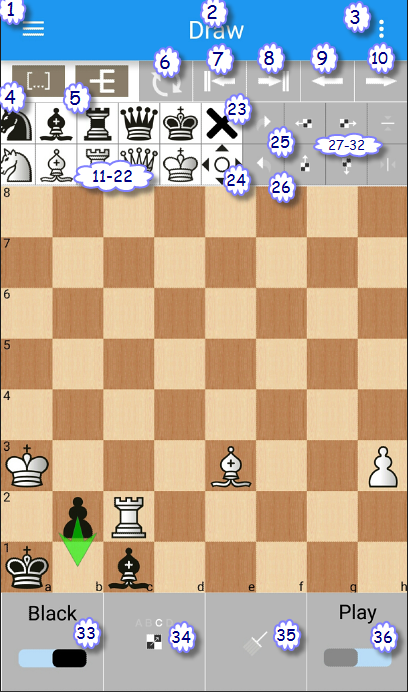 Img.3 Board screen
3.1.1 Position setup
Setting up pieces on the board
The purpose of Board screen is to set up positions on the board. Use a palette with pieces (buttons [11-22] on Img.3) to select a piece. The selected piece is highlighted in the palette. Now you can tap one or more squares on the board to place the piece there. If you tap a square where a piece of the same type is present - the piece is removed. If you accidentally erase a piece, just tap the square once more and the piece will be restored.
If you need to remove several pieces from the board then select cross  [23] to activate delete state. Tap the squares you want to clear.
You can clear all the pieces from the board by tapping  [35].
[35].
Piece movement
After placing the pieces on the board you may want to rearrange them. Use movement  [24] button to enter movement state. Here you can drag pieces from one square to another and you are not restricted to legal moves. You can move any piece to any square, but note that the side to move is not changed. This is because you are still setting up the position. (When you want to play according to the rules of chess, switch to the Notation screen or activate Play state.)
You can also move all the pieces at once with the 6 buttons on the right hand side of the palette. Four buttons with arrows Board Left, Board Up, Board Right and Board Down [27-30] move all the pieces in the specified direction. The pieces on the edge of the board are not removed but wraparound to the opposite edge of the board.
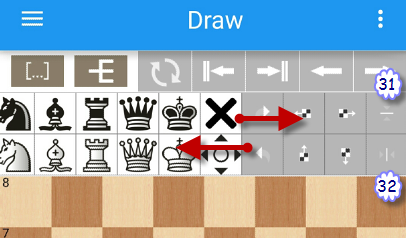 Img. 4 Shifting pallette left or right
Two invert buttons  [31],
[31],  [32] invert the pieces left-right or up-down. Note that in the latter case the color of the pieces is also inverted. If the buttons are not visible on the screen, use left gesture to make the buttons visible as illustrated in Img. 4..
3.1.2 Other operations
Undo  [26] cancels the latest edit operation on the board. Tapping the button repeatedly goes further back in the edit history. Redo
  [25] reverts the effects of an undo action.
White/Black  [33] (under the board) sets the side to move.
If you feel that it will be more comfortable to look at a position from the opposite side then tap Rotate board  [6].
[6].
If you need to specify en passant pawn (i.e. the pawn just moved two squares forward), tap En Passant  [34] and then the pawn.
3.1.3 Getting evaluations and making moves
The server is queried automatically after each change to the position so there is no need for a button to send a request to the server for the evaluation.The evaluation, specifying the number of moves to mate, is displayed in the upper status line [2].
You can make the best move in the position by tapping Move Forward  [10]. The variation with the moves you make is stored by the program, and you can examine it any time you like. To take a move back use Move Back
  [9]. Home
  [7] goes to the start of the line, End
  [8] - to the end of the line. The buttons for browsing the lines are available on many screens in the program.
3.1.4 Switching between screens
The Board screen cannot cover all the endgame tablebase features of the program. The Notation screen and the Tree screen provide additional information and methods.
Notation  [4] switches to the Notation screen designed to view and browse the variations from the server. After switching to the Notation screen the Notation button transforms to the Board
  button, so you can return back to the Board screen. In general, the two screen selection buttons provide a quick way to switch from the current screen to the other two screens.
Tree  [5] switches to the Tree screen which displays an overview of the moves available in a position.
Besides the button you can use the hardware Back button on your device to switch to the Board screen from Notation and Tree.
3.1.5 Playing against the computer
Play  [36] switches to Play state. In this state the program will reply to the moves you make. Remember that you are playing an infallible opponent, so don’t expect a blunder!
You still can see the distance to mate in the upper status line helping to understand the position better. But if you want real playing conditions without any help, open the local menu [3] and uncheck DTM [x] (DTM stands for Distance To Mate).
Note that there are two arrows on the Move Forward and Move Back icons in Play state. This means that they go two moves forward or back (one for your side and another for the opponent side). As a result you always see the position with the same side to move as in the starting position. If you need to change the side to move then deactivate the Play state, make a move back or forward and activate the Play state again.
3.1.6 Good and bad squares functionality
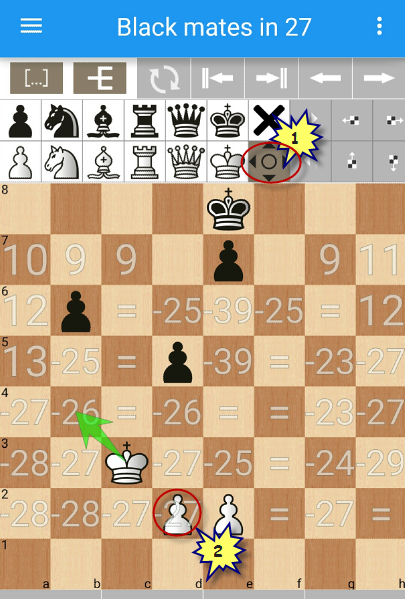
When you explore a position it is often interesting to know the effect of placing a specific piece on different squares on the board. This can help you understand the position better. You can see which squares transform the position from win to draw, how the distance to mate changes depending on the location of the piece and so on. However, it can be tedious to set up all the positions manually and it is hard to keep track of the information. Fortunately, the program has a special feature to quickly give you a clear overview of the effect of placing a piece on all the squares on the board where it can be legally placed. The screenshot shows a position with 2 white pawns against 3 black pawns. The programs informs that white loses in 27 moves. The best moves is Kb4. Let’s try to find out if there are squares for the white pawns in this ending that make the position a draw. Good and bad squares function helps here.
1) Tap the Movement [1] button. It will be highlighted in gray.
2) Hold the d2 pawn [2] without dragging it to another square. After a second gray numbers with evaluations appear on the squares. They will disappear if you release the pawn. If you hold the pawn longer, the numbers will change color to white and will stay on the screen until you change the position.
In this example, we see negative numbers on most squares, indicating that if the pawn on d2 was instead on one of these squares white would lose in the specified number of moves. Some squares are marked with = sign (e.g. f2) indicating that if the pawn was on one of those squares white could draw. 7 squares contain positive numbers. In case the pawn was on one of these squares the black king would be unable to prevent pawn promotion and white would win.
3.2 Notation screen
When you switch to the Notation screen ( [4]) the program queries the server for the full line of optimal moves till mate and shows this line. In case of a drawn position only one move is displayed. You can browse the line forward and backward. You can also make alternative moves and check the optimal line in that case.
Unlike the Board screen you can’t place pieces on the board or move them freely around the board. You can only make legal chess moves.
Besides using Move Forward and Move Back you can use gestures (Right and Left) on the upper status line (i.e. the line with the position evaluation). The status line is larger than a button so it is easier to operate.
3.3 Tree screen
The Tree screen ( [5]) displays a selection of up to 10 moves in the current position.
- The first 8 moves are the best ones. They are listed in the order of decreasing evaluation.
- The last move is always a losing move (if one exists).
- In case of a win the move before last is a drawing move.
Displaying two weak moves at the end of the list is useful for knowing what kind of moves should be avoided in a position.
The Move Forward button works like the one on the Board screen. Tapping it makes the best move in the position. The best move is the first move in the list (highlighted in bold).You can also use gesture Right for moving forward. The Move Back button or Left gesture on the status line take a move back.
If you want to make a move other than the first move in the list tap the desired move. The move will be highlighted in bold. Then tap the Move Forward button. An alternative method is to make gesture Right on a move in the list (this method may be more convenient on a small device).
The free version of the application displays ads under the list of moves.
You can switch to Notation mode by tapping . To return to the Board screen tap or use the hardware Back button.
3.4 Local menu in Position mode
 Img. 6. Local menu of Position mode.
The local menu gives access to useful but less frequently used functions.
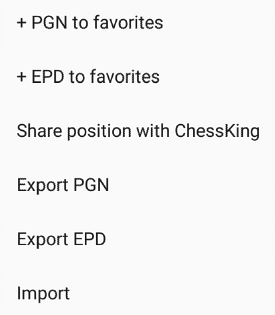
Before describing the menu items, note that the standard format to save positions is EPD format and the standard format to save games is PGN format. Most programs can store and to load games and positions in these formats.
- + PGN to favorites. Adds the starting position with the variation to the list of your favorite positions. A descriptive text can be saved with the position. The favorites list is accessible via the Main menu of the program.
- + EPD to favorites. The same as above, but only the current position is saved.
- Share position with ChessKing. If you believe that a position is interesting in some way or dubious you can send it to the developers by e-mail. The EPD-record of the position is automatically included in the message.
- Export PGN. Share a game (a line of moves) with other applications on your own or other devices. Export copies the game to clipboard or saves it to a file on your device or a cloud storage like Dropbox or Google Drive. For a description of how to work with cloud storage consult the documentation of the relevant service.
- Export EPD. The same as Export PGN, but only the position is exported.
- Import. Loads a game or a position that has been saved by this or another application. PGN and EPD file formats are recognized automatically by the program.
4. Contents mode
Simply having access to the huge database of 3-7 piece endgames is of great value to chess players. However, that is just the tip of the iceberg when it comes to their use for improving your chess. They are also a great foundation for endgame training. Regardless of what move the student tries, the endgame database will provide immediate feedback with a precise evaluation. There are 250 training tasks included with the package. These tasks help to improve your endgame skills. The tasks are of varying difficulty levels, from beginner to top grandmaster.
The unique aspect of the training tasks is that the program doesn’t expect just a single line with the best solution from you. You can make any move as long as it is good enough to achieve the goal: win or draw. The only limit is the number of moves that is allowed to achieve the goal.
If a position is aimed at beginners you need to play until checkmate. If a position is a complex one, achieving a decisive material advantage is sufficient.
The tasks are categorized according to themes. Themes are broken into subthemes and the last level is a lesson with tasks.
A typical way of training is to browse the themes, then open a lesson and select a task from the list of tasks in the lesson. But you can also go directly to Training mode from the Main menu, skipping the choices in Contents and Lessons modes.
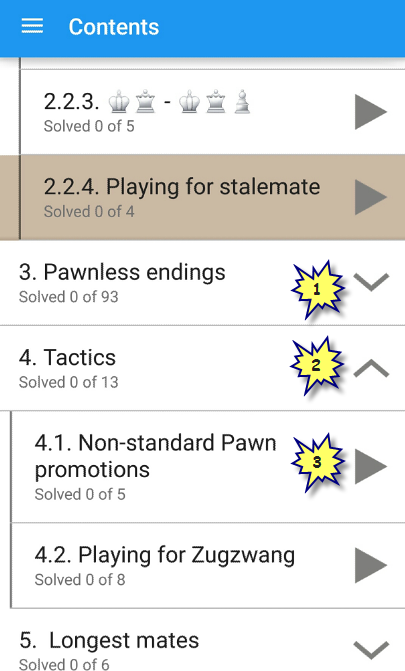
Img. 7 shows a part of the contents where the following details are of interest:
- The pointer directed downwards near the item “3. Pawnless endings” [1] indicates that the current item can be expanded to access lower level items.
- To the right of item “4. Tactics” we see the pointer directed upwards [2] indicating that its subitems are expanded. Tapping the pointer will collapse the list of subitems.
- To the right of item “4.1 Non-standard pawn promotions” the right-pointing triangle [3] indicates that this subtheme with 5 tasks is a lesson. So if you tap this item a list of tasks in the lesson will be displayed (in the Lessons mode).
5. Lessons mode
Lessons mode can be opened from Contents mode by selecting a lesson or directly from the Main menu. To return from Lessons mode to Contents mode use the hardware Back button or the Main menu.
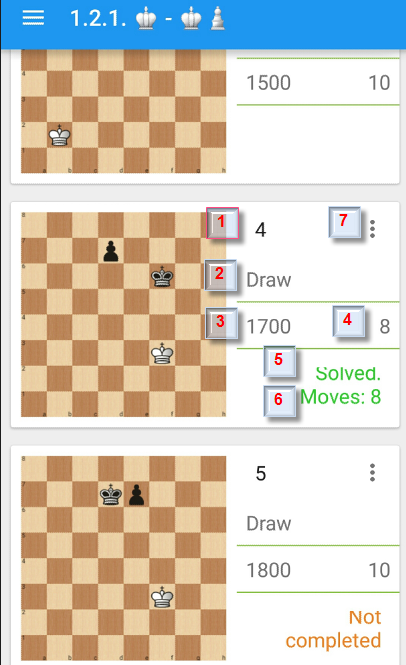
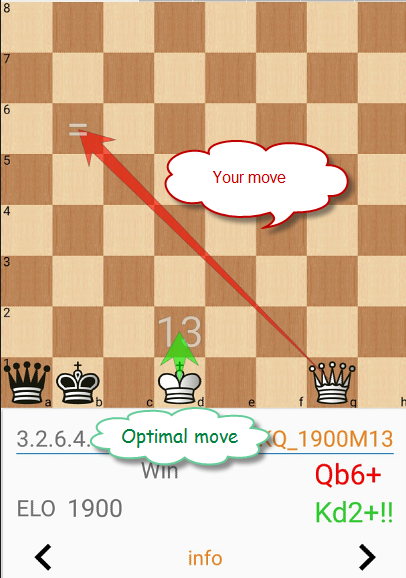
Select a task from the list and start training or go to the next/previous lesson using gestures Left and Right. Look at the image on the left with lesson 1.2.1 consisting of tasks where the lone King fights for a draw against King and Pawn. You see the following data for every task.
[1]. “4”. The number of the task.
[2]. “Draw”. The goal of the task.
[3]. “1700”. Difficulty level - the approximate rating of the students who may be interested in solving this task.
[4]. “8”. The number of moves that the student should make. If the program evaluates the position as drawn after 8 moves then the task will be marked as successfully solved.
[5]. “Solved”. Task state. Solved/ Not Solved/ Not completed/ Not considered.
[6]. “Moves: 8”. Number of moves that were made in the last successful solution.
[7]. The task local menu button.
You need to select one of the tasks to start solving it in the Training mode.
If you want to look at the next or the previous lesson there is no need to return to Contents mode and select a new lesson there. Left gesture in the list sends you to the next lesson, Right gesture sends you to the previous lesson. Most users prefer this way of browsing the lessons.
6. Training mode
Training mode can be opened by selecting a task in Lessons mode or from the Main menu. To return back to the Lessons mode tap the Lessons [1] button or use the Main menu.
In Training mode you need to make the moves and the program will reply with the best move. You always have White, so there is no Side to move indication.
Position evaluation [2] is displayed in the upper status line (the value +20 means “White mates in 20 moves”).
In case you selected the wrong move use the Move Back [3] button with double arrows.
Under the board you see the Task number [4] and its ID [5]. Note that in case of a program update the number of the task can change but the task ID stays the same.
One of 3 goals should be completed in a task: Mate, Win or Draw [6]. Win usually means transforming to an ending with a heavy piece against a King, but other endings may also be considered a win.
Task rating [7] indicates approximate complexity of the task. It is a highly subjective number. The task on the image has a high rating - 2200, so this task will be interesting even for the people who frequently play in chess tournaments. (BTW, the “obvious” move 1.g8=Q doesn’t win in this position).
There is a limit to the Number of moves [8] given to achieve the goal. Although White can mate in 20 moves in the position above you are allowed to make twice as many moves here to complete the task. Unlike computers, people can’t be expected to make only optimal moves. If, after 40 moves, White does not have a decisive material advantage then the task will not be considered as solved.
The buttons < [9] and > [11] allow to go to the next or the previous task at any time you like. Besides these buttons you can navigate through the tasks using gestures Left and Right under the board area.
If you switch to a new task you lose your solution to the current task, but task status is saved. The status is indicated by color of task ID [5]. For tasks that were not solved (no move was made) the ID is displayed in black color. For tasks that were not completed but some moves were made the ID is displayed in brown color. For tasks where you exceeded the specified number of moves, were mated or stalemated instead of win, the ID is displayed in red color. Successfully solved tasks are displayed in green. The Status field is colored in the same colors in Lessons mode too.
Info [10] button opens a window with detailed information about the task, a path to the task in the contents and author comments if they exist.
You can rate the tasks with 1 - 5 stars. This helps the developers to exclude less interesting tasks and to add more interesting tasks.
Tap the window to close it.
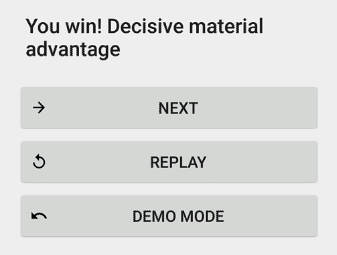
After a successful or unsuccessful attempt to solve a task, a window with NEXT, REPLAY, DEMO MODE appears. You can go to the next task, solve the task once more or you can analyze your solution by choosing Demo mode. In the last case the program goes to the starting position and allows you to follow your moves using the Forward button or gesture Right in the upper status line. In every position you can see an arrow indicating your move on the board. The notation for the move is displayed under the board. If your move was not optimal then the program displays the optimal move on the board and its notation under the board. The optimal moves are displayed in green, the non-optimal moves are displayed in red.
You can make other moves in Demo mode and the program will reply. But new moves don’t change the status of the task.
As in Position mode and take you to the Notation and Tree screens respectively (described in Chapter 3) for exploring the position further. Return back to the main screen by tapping  or with the help of the hardware Back button.
7. Favorites mode
In Favorites mode you can browse positions and games that you saved earlier by choosing the local menu items “+ PGN to favorites” and “+ EPD to favorites” in Position and Training modes. Here you can see your favorite positions, their evaluations and the date/time of when they were saved. Comments for positions are displayed and can be edited. All actions in this mode are quite intuitive.
8. Settings
This mode is also straightforward and shouldn’t cause any problems for the user. Few users will want to change the standard settings.
9. Feedback
We appreciate if you take the time to send us feedback about the program. This will help us fix any problems you have faced and implement new and useful features. Your feedback will strongly influence the future development of the program.
10. Tables with larger number of pieces
One frequently asked question is when 8-9-10-…-31-32 piece tables can be expected to become available. Will chess be fully solved sometime?
Generating endgame tables for every additional piece (3-4-5-6-7-8-9-...) requires a tremendous amount of work, both from programmers and computers. The 7-piece Lomonosov tables were completed several years ahead of any other team. The state of the art programming methods and powerful hardware were used. Calculation of 8-piece tables requires 100 times more disk space and memory and 1000 times more calculations. So the new tables definitely will be available sometime during the next … 100 years.
But computers improve quickly, so even from a pessimistic point of view 15 years will be enough for completing the 8-piece tables. Our advice to you is to search for 8-piece chess tables in 2027. In case of you are a highly optimistic person start searching for 8-piece tables in 2020.
Based on the trends of computer performance and storage technology over the years we might expect that the problems involved in generating chess tables with an additional piece might be solved every 15 years. But sooner or later computers progress will slow down. So the question about a full solution of chess is still open.